目录
登陆注册及推出主页面
这部分有两种写法:一种是在SceneDelegate中推出LoginVC,后在判断登陆成功后退去主要程序。另一种则是先加载主程序,后推出登陆页面。通过同组同学实践证明,后者在推出登陆页面时会闪一下,因此还是建议采用第一种方法。
本人的登陆页面在最初使用数组储存用户名和密码,后来发现在修改密码时会较为困难,因此我创建了一个单例类。
同时我简单了解了一种轻量化本地存储方式 setObject: forKey:
他支持的对象类型包括:
类型 示例 NSString 用户名、token 等 NSNumber 整数、布尔值等 NSArray 字符串数组、数字数组等 NSDictionary 键值对结构 NSDate 时间 NSData 二进制数据(如图片、加密)
- (void)saveLoginStatus { NSUserDefaults *defaults = [NSUserDefaults standardUserDefaults]; [defaults setObject:@"wutong" forKey:@"username"]; [defaults setBool:YES forKey:@"isLoggedIn"]; [defaults synchronize]; // 可选}
//读取时
NSString *name = [[NSUserDefaults standardUserDefaults] objectForKey:@"username"];BOOL isLoggedIn = [[NSUserDefaults standardUserDefaults] boolForKey:@"isLoggedIn"];NSUserDefaults 的 setObject:forKey: 是用于保存简单用户数据的 API,轻量、易用,适合设置类数据(如用户名、偏好设置、登录状态等)。
// 3GShareee//// Created by 吴桐 on 2025/7/18.//
#import "UserManager.h"
@implementation UserManager
//单例+ (instancetype)sharedManager { static UserManager *manager = nil; static dispatch_once_t onceToken; dispatch_once(&onceToken, ^{ manager = [[UserManager alloc] init]; [manager loadUserData]; }); return manager;}
- (id)init { self = [super init]; if (self) { _usernames = [NSMutableArray array]; _passwords = [NSMutableArray array]; [_usernames addObject:@"1"]; [_passwords addObject:@"1"]; } return self;}
//保存到本地- (void)saveUserData { [[NSUserDefaults standardUserDefaults] setObject:self.usernames forKey:@"savedUsernames"]; [[NSUserDefaults standardUserDefaults] setObject:self.passwords forKey:@"savedPasswords"]; [[NSUserDefaults standardUserDefaults] synchronize]; //不懂,好像是保存}
- (void)loadUserData { NSArray *savedUsernames = [[NSUserDefaults standardUserDefaults] objectForKey:@"savedUsernames"]; NSArray *savedPasswords = [[NSUserDefaults standardUserDefaults] objectForKey:@"savedPasswords"]; NSDictionary *savedGenders = [[NSUserDefaults standardUserDefaults] objectForKey:@"savedUserGenders"];
if (savedUsernames) { self.usernames = [savedUsernames mutableCopy]; } if (savedPasswords) { self.passwords = [savedPasswords mutableCopy]; }
if (![self.usernames containsObject:@"1"]) { [self.usernames addObject:@"1"]; [self.passwords addObject:@"1"]; }}
- (BOOL)updatePasswordForUser:(NSString *)username oldPassword:(NSString *)oldPassword newPassword:(NSString *)newPassword { NSUInteger index = [self.usernames indexOfObject:username];
if (index == NSNotFound) { //NSNotFound 是 Objective-C 中的一个常量,表示“没有找到”的情况,常用于查找操作的结果。 return NO; } if (![oldPassword isEqualToString:self.passwords[index]]) { return NO; }
// 更新密码 self.passwords[index] = newPassword; [self saveUserData];
return YES;}
@end同时,我设置了管理员密码1 1,用于绕过调试时便捷登陆,不必输入较长密码。注册功能和修改密码功能中,密码为不小于6位的数字或字母。
自动登录
我设置了autoBtn,和autoBtn01。前者为切换的按钮主体,后者为一个辅助按钮,当用户点击文字时,也会触发和前者相同的函数从而实现按钮图标的切换,更加人性化。
[self.autoBtn setImage: [UIImage imageNamed: @"autoreserved.png"] forState: UIControlStateNormal]; [self.autoBtn setImage: [UIImage imageNamed: @"autohighlighted.png"] forState: UIControlStateSelected]; self.autoBtn.selected = NO; [self.autoBtn addTarget: self action: @selector(pressAuto) forControlEvents: UIControlEventTouchUpInside];
self.autoBtn1 = [UIButton buttonWithType: UIButtonTypeRoundedRect]; self.autoBtn1.frame = CGRectMake(67, 550, 64, 16); [self.autoBtn1 setTitle: @"自动登录" forState: UIControlStateNormal]; [self.autoBtn1 setTintColor: [UIColor colorWithDisplayP3Red: 14.0 / 255 green: 46.0 / 255 blue: 121.0 / 255 alpha: 1.0]]; [self.autoBtn1 addTarget: self action: @selector(pressAuto) forControlEvents: UIControlEventTouchUpInside];#### 登陆
```objective-cUserManager *userManager = [UserManager sharedManager]; self.arrayUsername = userManager.usernames; self.arrayPassword = userManager.passwords;-(void) pressLeft:(UIButton *) button{ NSString *username = self.userName.text; NSString *password = self.passWord.text;
// 非空检查 if (username.length == 0 || password.length == 0) { [self showAlertWithMessage:@"用户名和密码不能为空"]; return; }
// 长度限制 if (username.length > 10 || password.length > 10) { [self showAlertWithMessage:@"用户名和密码不能超过10个字符"]; return; }
// 正则判断是否仅包含字母、数字、下划线 // 本人暂时还没学... NSRegularExpression *regex = [NSRegularExpression regularExpressionWithPattern:@"^[A-Za-z0-9_]+$" options:0 error:nil]; if ([regex numberOfMatchesInString:username options:0 range:NSMakeRange(0, username.length)] == 0 || [regex numberOfMatchesInString:password options:0 range:NSMakeRange(0, password.length)] == 0) { [self showAlertWithMessage:@"用户名和密码只能包含字母、数字和下划线"]; return; }
BOOL correct = NO; for (int i = 0; i < self.arrayUsername.count; i++) { if ([self.arrayUsername[i] isEqualToString: self.userName.text] && [self.arrayPassword[i] isEqualToString: self.passWord.text] && (self.userName.text != nil) && (self.passWord.text != nil)) { correct = YES;
// 保存当前登录用户 UserManager *userManager = [UserManager sharedManager]; userManager.currentUser = self.userName.text;
break; } } if (!correct) { UIAlertController* wrongWarning = [UIAlertController alertControllerWithTitle:@"❗️" message:@"账号密码错误!" preferredStyle:UIAlertControllerStyleAlert]; UIAlertAction* sure = [UIAlertAction actionWithTitle:@"O K" style:UIAlertActionStyleDefault handler:nil]; [wrongWarning addAction:sure]; [self presentViewController:wrongWarning animated:YES completion:nil]; } else { FirstVC* firstView = [[FirstVC alloc] init]; firstView.view.backgroundColor = [UIColor colorWithRed: (230.0 / 255) green: (222.0 / 255) blue: (220.0 / 255) alpha: 1]; firstView.tabBarItem = [[UITabBarItem alloc] initWithTitle: nil image: [[UIImage imageNamed: @"FirstVC.png"] imageWithRenderingMode: UIImageRenderingModeAlwaysOriginal] selectedImage: [[UIImage imageNamed: @"FirstVC_tapped.png"] imageWithRenderingMode: UIImageRenderingModeAlwaysOriginal] ]; SecondVC* secondView = [[SecondVC alloc] init]; secondView.view.backgroundColor = [UIColor colorWithRed: (230.0 / 255) green: (222.0 / 255) blue: (220.0 / 255) alpha: 1]; secondView.tabBarItem = [[UITabBarItem alloc] initWithTitle: nil image: [[UIImage imageNamed: @"SecondVC.png"] imageWithRenderingMode: UIImageRenderingModeAlwaysOriginal] selectedImage: [[UIImage imageNamed: @"SecondVC_tapped.png"] imageWithRenderingMode: UIImageRenderingModeAlwaysOriginal] ]; ThirdVC* thirdView = [[ThirdVC alloc] init]; thirdView.view.backgroundColor = [UIColor colorWithRed: (230.0 / 255) green: (222.0 / 255) blue: (220.0 / 255) alpha: 1]; thirdView.tabBarItem = [[UITabBarItem alloc] initWithTitle: nil image: [[UIImage imageNamed: @"ThirdVC.png"] imageWithRenderingMode: UIImageRenderingModeAlwaysOriginal] selectedImage: [[UIImage imageNamed: @"ThirdVC_tapped.png"] imageWithRenderingMode: UIImageRenderingModeAlwaysOriginal] ]; FourthVC* fourthView = [[FourthVC alloc] init]; fourthView.view.backgroundColor = [UIColor colorWithRed: (230.0 / 255) green: (222.0 / 255) blue: (220.0 / 255) alpha: 1]; fourthView.tabBarItem = [[UITabBarItem alloc] initWithTitle: nil image: [[UIImage imageNamed: @"FourthVC.png"] imageWithRenderingMode: UIImageRenderingModeAlwaysOriginal] selectedImage: [[UIImage imageNamed: @"FourthVC_tapped.png"] imageWithRenderingMode: UIImageRenderingModeAlwaysOriginal] ]; FifthVC* fifthView = [[FifthVC alloc] init]; fifthView.view.backgroundColor = [UIColor colorWithRed: (230.0 / 255) green: (222.0 / 255) blue: (220.0 / 255) alpha: 1]; fifthView.tabBarItem = [[UITabBarItem alloc] initWithTitle: nil image: [[UIImage imageNamed: @"FifthVC.png"] imageWithRenderingMode: UIImageRenderingModeAlwaysOriginal] selectedImage: [[UIImage imageNamed: @"FifthVC_tapped.png"] imageWithRenderingMode: UIImageRenderingModeAlwaysOriginal] ];
//用NavigationController将每个视图包起来 UINavigationController* navigationFirst = [[UINavigationController alloc] initWithRootViewController:firstView]; UINavigationController* navigationSecond = [[UINavigationController alloc] initWithRootViewController:secondView]; UINavigationController* navigationThird = [[UINavigationController alloc] initWithRootViewController:thirdView]; UINavigationController* navigationFourth = [[UINavigationController alloc] initWithRootViewController:fourthView]; UINavigationController* navigationFifth = [[UINavigationController alloc] initWithRootViewController:fifthView];
//组装 UINavigationBarAppearance* appearance = [[UINavigationBarAppearance alloc] init]; appearance.backgroundColor = [UIColor colorWithRed: (43.0 / 255) green: (123.0 / 255) blue: (191.0 / 255) alpha: 1]; firstView.navigationController.navigationBar.standardAppearance = appearance; firstView.navigationController.navigationBar.barStyle = UIBarStyleDefault;
firstView.navigationController.navigationBar.scrollEdgeAppearance = appearance; secondView.navigationController.navigationBar.scrollEdgeAppearance = appearance; thirdView.navigationController.navigationBar.scrollEdgeAppearance = appearance; fourthView.navigationController.navigationBar.scrollEdgeAppearance = appearance; fifthView.navigationController.navigationBar.scrollEdgeAppearance = appearance;
NSArray* arrayViewController = [NSArray arrayWithObjects: navigationFirst, navigationSecond, navigationThird, navigationFourth, navigationFifth, nil]; UITabBarController* tabBarViewController = [[UITabBarController alloc] init]; tabBarViewController.viewControllers = arrayViewController; // 在tabBar上方添加自定义覆盖视图 UIView* overlayView = [[UIView alloc] initWithFrame:CGRectMake(0, 50, WIDTH, tabBarViewController.tabBar.bounds.size.height)]; overlayView.backgroundColor = [UIColor blackColor]; overlayView.tag = 1001; [tabBarViewController.tabBar addSubview:overlayView]; [tabBarViewController.tabBar bringSubviewToFront:overlayView]; tabBarViewController.modalPresentationStyle = UIModalPresentationFullScreen; [self presentViewController: tabBarViewController animated: YES completion: nil]; }
}#### 自动收起键盘
```objective-c- (void)touchesBegan:(NSSet<UITouch *> *)touches withEvent:(UIEvent *)event { [self.view endEditing:YES];}这两个方法笔者暂时也不算很清楚讲述,只算一知半解,只知道能实现这个功能
- (void)keyboardWillAppear:(NSNotification *)notification{ CGRect keyboardFrame = [notification.userInfo[UIKeyboardFrameEndUserInfoKey] CGRectValue]; CGFloat keyboardY = keyboardFrame.origin.y; [UIView animateWithDuration:0.3 animations:^{ self.view.transform = CGAffineTransformMakeTranslation(0, keyboardY - self.view.frame.size.height + 20); }];}
- (void)keyboardWillDisAppear:(NSNotification *)notification{ [UIView animateWithDuration:0.3 animations:^{ self.view.transform = CGAffineTransformIdentity; }];}#### 注册
核心代码如下
```objective-c-(void) pressConfirm { NSString *username = self.usernameTextField.text; NSString *password = self.passwordTextField.text; UserManager *userManager = [UserManager sharedManager];
if (username.length == 0 || password.length == 0) { UIAlertController* warning = [UIAlertController alertControllerWithTitle:@"提示" message:@"账号或密码不能为空" preferredStyle:UIAlertControllerStyleAlert];
UIAlertAction* warn = [UIAlertAction actionWithTitle:@"确定" style:UIAlertActionStyleDefault handler:nil];
[warning addAction:warn]; [self presentViewController:warning animated:YES completion:nil]; return; }
// 检查密码长度是否大于6位 if (password.length < 6) { UIAlertController* warning = [UIAlertController alertControllerWithTitle:@"提示" message:@"密码长度必须大于6位" preferredStyle:UIAlertControllerStyleAlert];
UIAlertAction* warn = [UIAlertAction actionWithTitle:@"确定" style:UIAlertActionStyleDefault handler:nil];
[warning addAction:warn]; [self presentViewController:warning animated:YES completion:nil]; return; }
// 检查用户名是否已存在 if ([userManager.usernames containsObject:username]) { UIAlertController* warning = [UIAlertController alertControllerWithTitle:@"提示" message:@"该用户名已被注册" preferredStyle:UIAlertControllerStyleAlert];
UIAlertAction* warn = [UIAlertAction actionWithTitle:@"确定" style:UIAlertActionStyleDefault handler:nil]; [warning addAction:warn]; [self presentViewController:warning animated:YES completion:nil]; return; }
// 所有检查通过,注册新用户 [userManager.usernames addObject:username]; [userManager.passwords addObject:password]; [userManager saveUserData]; // 保存到磁盘
// 显示注册成功提示 UIAlertController* successAlert = [UIAlertController alertControllerWithTitle:@"注册成功" message:@"您已成功注册" preferredStyle:UIAlertControllerStyleAlert];
UIAlertAction* okAction = [UIAlertAction actionWithTitle:@"确定" style:UIAlertActionStyleDefault handler:^(UIAlertAction * _Nonnull action) { // 关闭注册页面 [self dismissViewControllerAnimated:YES completion:nil]; }];
[successAlert addAction:okAction]; [self presentViewController:successAlert animated:YES completion:nil];
// 清空输入框 self.usernameTextField.text = @""; self.passwordTextField.text = @""; self.emailTextField.text = @"";}HomeVC
因为文章的格式类似如图,我新建了一个cell用于设置所有类似的页面,textTableViewCell

首页中,我们需要在点击假日时跳转到另一个页面,同时实现两个页面之间的点赞同步。
先来说说推出假日页面。
我在texttableView中添加了一个手势识别
UITapGestureRecognizer *tapGesture = [[UITapGestureRecognizer alloc] initWithTarget:self action:@selector(CellTap)]; [self.contentView addGestureRecognizer:tapGesture];- (void)CellTap { if ([self.delegate respondsToSelector:@selector(textTableViewCellDidTap:)]) { [self.delegate textTableViewCellDidTap:self]; }}在首页中: 我们只处理第一行的情况
- (void)textTableViewCellDidTap:(textTableViewCell *)cell { NSIndexPath *indexPath = [self.tableView indexPathForCell:cell]; if (indexPath.section == 1 && indexPath.row == 0) { NSMutableDictionary *holidayData = [self.dataArray[0] mutableCopy];
HolidayDetailViewController *detailVC = [[HolidayDetailViewController alloc] init]; detailVC.holidayData = holidayData; detailVC.delegate = self; detailVC.isLiked = [holidayData[@"isLiked"] boolValue]; // 传递当前点赞状态
// 推入导航栈 [self.navigationController pushViewController:detailVC animated:YES]; }}再来说说点赞。
其实下图中的方法更为简便
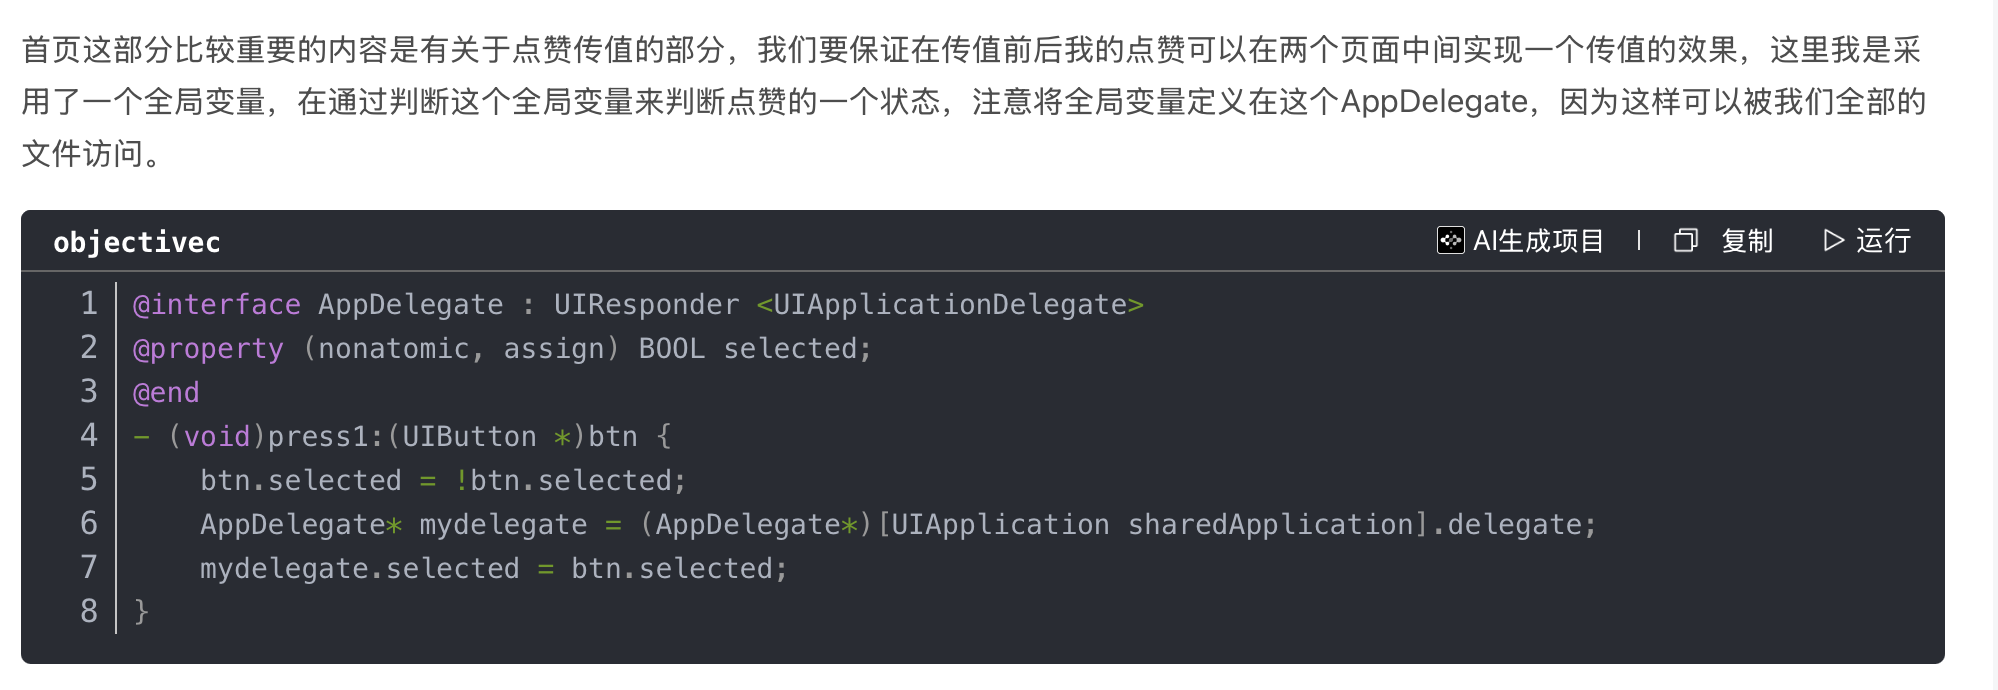
列表页点赞: textTableViewCell (按钮点击) → FirstVC (更新数据源) → 刷新UI
详情页点赞: HolidayDetailViewController → FirstVC (通过代理回调) → 更新数据源刷新列表页单元格
我单独有一篇博客讲解这部分:
SearchVC
搜索大白时,推出页面。
- (void)searchBarSearchButtonClicked:(UISearchBar *)searchBar { if ([self.searchBar.text isEqualToString:@"大白"]) { SearchResultViewController* searchResultsView = [[SearchResultViewController alloc] init]; [self.navigationController pushViewController: searchResultsView animated: YES]; }}还有一部分是上传页面
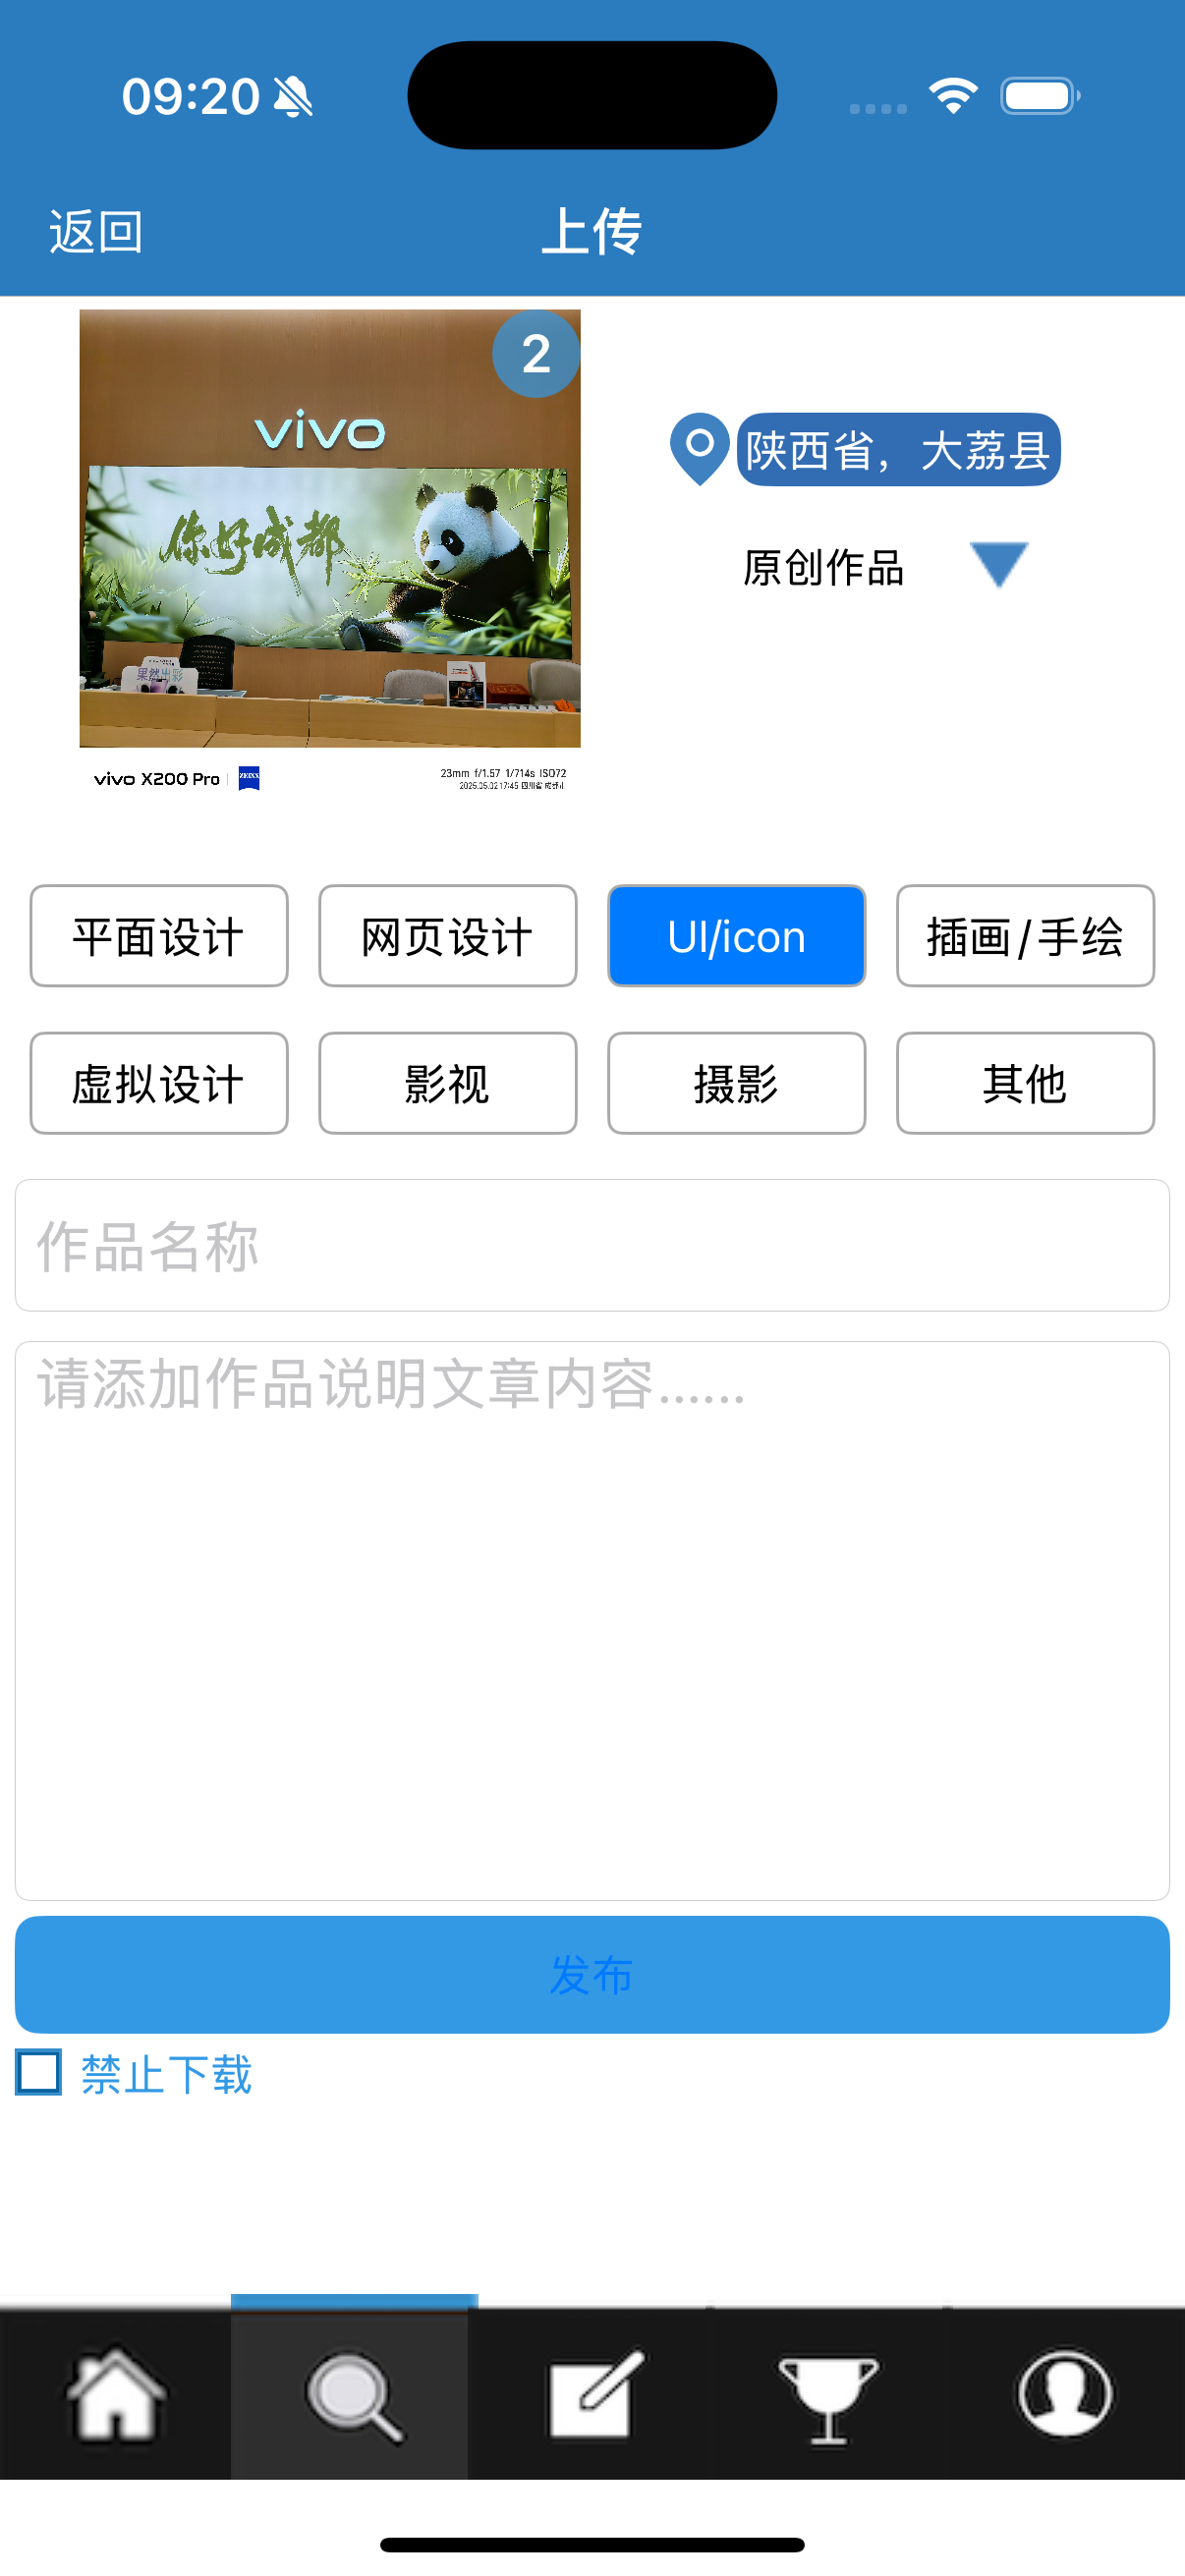
实现效果如图。两个textField用来输入作品名称和文章内容
上传图片:
一个choosePhoto按钮用来弹出照片墙,另一个numbersOfPhotolabel用来显示选中的照片数量。如上文示范图。
- (void)pressChoosePhotoButton { PhotoWallViewController* photoWallViewController = [[PhotoWallViewController alloc] init]; photoWallViewController.delegate = self; [self.navigationController pushViewController: photoWallViewController animated: YES];}- (void)pressPhoto: (UIButton*)button { if (button.selected == NO) { int selectNumber = (int)(button.tag - 100); self.numbersOfPhoto++; [self.imageNameArray addObject: [NSString stringWithFormat: @"photo%d.jpg", selectNumber]]; button.selected = YES; } else { int selectNumber = (int)(button.tag - 100); self.numbersOfPhoto--; [self.imageNameArray removeObject: [NSString stringWithFormat: @"photo%d.jpg", selectNumber]]; button.selected = NO; }}UIAlertAction* boomAction= [UIAlertAction actionWithTitle: @"确定" style: UIAlertActionStyleDefault handler: ^(UIAlertAction *action) { // 返回前调用代理方法 if ([self.delegate respondsToSelector:@selector(changedPhotoName:andNumber:)]) { [self.delegate changedPhotoName:self.imageNameArray.firstObject andNumber:self.numbersOfPhoto]; } [self.navigationController popViewControllerAnimated: YES]; }]; [boomAlert addAction: boomAction]; [self presentViewController: boomAlert animated:YES completion:nil];注意,在这里我们传回来的是数组的第一个元素
- (void)changedPhotoName:(NSString *)nameOfPhoto andNumber:(int)numbersOfPhoto { self.numbersOfPhoto = numbersOfPhoto; if (nameOfPhoto) { [self.choosePhoto setBackgroundImage:[UIImage imageNamed:nameOfPhoto] forState:UIControlStateNormal]; [self.choosePhoto setTitle:@"" forState:UIControlStateNormal]; }
//更新图片数量标签 self.numbersOfPhotoLabel.text = [NSString stringWithFormat:@"%d", numbersOfPhoto]; self.numbersOfPhotoLabel.hidden = (numbersOfPhoto == 0);}在发布页面修改照片数量,同时修改那个背景。效果如下:

ArticleVC
直接注册三个一模一样的cell,以实现互不干涉。古老简单但是有效
- (void)setupTableViews { CGFloat tableHeight = HEIGHT - 150;
self.tableView01 = [[UITableView alloc] initWithFrame:CGRectMake(0, 0, WIDTH, tableHeight) style:UITableViewStylePlain]; self.tableView01.delegate = self; self.tableView01.dataSource = self; self.tableView01.backgroundColor = [UIColor whiteColor]; self.tableView01.showsVerticalScrollIndicator = NO; self.tableView01.separatorStyle = UITableViewCellSeparatorStyleNone;
self.tableView02 = [[UITableView alloc] initWithFrame:CGRectMake(WIDTH, 0, WIDTH, tableHeight) style:UITableViewStylePlain]; self.tableView02.delegate = self; self.tableView02.dataSource = self; self.tableView02.backgroundColor = [UIColor whiteColor]; self.tableView02.showsVerticalScrollIndicator = NO; self.tableView02.separatorStyle = UITableViewCellSeparatorStyleNone;
self.tableView03 = [[UITableView alloc] initWithFrame:CGRectMake(WIDTH * 2, 0, WIDTH, tableHeight) style:UITableViewStylePlain]; self.tableView03.delegate = self; self.tableView03.dataSource = self; self.tableView03.backgroundColor = [UIColor whiteColor]; self.tableView03.showsVerticalScrollIndicator = NO; self.tableView03.separatorStyle = UITableViewCellSeparatorStyleNone;
// 注册cell [self.tableView01 registerClass:[textTableViewCell class] forCellReuseIdentifier:@"cell"]; [self.tableView02 registerClass:[textTableViewCell class] forCellReuseIdentifier:@"cell"]; [self.tableView03 registerClass:[textTableViewCell class] forCellReuseIdentifier:@"cell"];
[self.scrollView addSubview:self.tableView01]; [self.scrollView addSubview:self.tableView02]; [self.scrollView addSubview:self.tableView03];}
- (void)createArticles { UIImage *defaultImage = [UIImage systemImageNamed:@"photo"];
self.articlesSection0 = [NSMutableArray arrayWithArray:@[ @{@"thumbnail": [UIImage imageNamed:@"article1"] ?: defaultImage, @"title": @"如期而至", @"author": @"SHARE 钢蛋", @"category": @"", @"time": @"16", @"isLiked": @NO}, @{@"thumbnail": [UIImage imageNamed:@"article2"] ?: defaultImage, @"title": @"duck的学问", @"author": @"SHARE 王二麻", @"category": @"", @"time": @"20", @"isLiked": @NO}, @{@"thumbnail": [UIImage imageNamed:@"article3"] ?: defaultImage, @"title": @"您的故事", @"author": @"SHARE 和尚", @"category": @"", @"time": @"25", @"isLiked": @NO}, @{@"thumbnail": [UIImage imageNamed:@"article4"] ?: defaultImage, @"title": @"八月的故事", @"author": @"SHARE 二五", @"category": @"", @"time": @"60", @"isLiked": @NO}, @{@"thumbnail": [UIImage imageNamed:@"article5"] ?: defaultImage, @"title": @"我们终将再见", @"author": @"SHARE 小唐", @"category": @"", @"time": @"60", @"isLiked": @NO} ]];
self.articlesSection1 = [self.articlesSection0 mutableCopy]; self.articlesSection2 = [self.articlesSection0 mutableCopy];}MyVC
我的信息
评论 && 活动通知 && 我的推荐
这段代码我也没有很懂,只知道能实现一个类似这样的效果
UIAlertController *alert = [UIAlertController alertControllerWithTitle:nil message:@"没有新内容" preferredStyle:UIAlertControllerStyleAlert]; [self presentViewController:alert animated:YES completion:nil]; dispatch_after(dispatch_time(DISPATCH_TIME_NOW, (int64_t)(2.0 * NSEC_PER_SEC)), dispatch_get_main_queue(), ^{ [alert dismissViewControllerAnimated:YES completion:nil]; });
新关注的
这部分需要实现一个关注的留存如下图
通过如下方式可以确保只创建一个followVC,进而保存之前的关注。
@property (nonatomic, strong) followViewController *followVC;
else if ([messageType isEqualToString:@"新关注的"]) { // 使用强引用确保只创建一次 followViewController if (!_followVC) { _followVC = [[followViewController alloc] init]; _followVC.title = @"关注列表"; _followVC.view.backgroundColor = [UIColor whiteColor]; } [self.navigationController pushViewController:_followVC animated:YES];##### 私信:
首先要隐藏tabBar
```objective-c// 隐藏tabBar- (void)viewWillAppear:(BOOL)animated { [super viewWillAppear:animated]; self.tabBarController.tabBar.hidden = YES;}
// 恢复tabBar- (void)viewWillDisappear:(BOOL)animated { [super viewWillDisappear:animated]; self.tabBarController.tabBar.hidden = NO;}
- (void)setupMessages { _messageArray = [NSMutableArray array]; _rowHeightArray = [NSMutableArray array];
[self addMessage:@"1" isOutgoing:NO]; [self addMessage:@"2" isOutgoing:YES]; [self addMessage:@"3" isOutgoing:NO]; [self addMessage:@"4" isOutgoing:YES]; [self addMessage:@"5" isOutgoing:NO]; [self addMessage:@"6" isOutgoing:YES]; [self addMessage:@"7" isOutgoing:YES]; [self scrollToBottom];}这段代码是我设置的初始聊天,isoutgoing属性用来表示是发送还是接收,实现信息的交替出现
- (void)addMessage:(NSString *)message isOutgoing:(BOOL)isOutgoing { NSDictionary *messageDict = @{ @"text": message, @"outgoing": @(isOutgoing) }; [_messageArray addObject:messageDict];
NSDictionary *attri = @{NSFontAttributeName: [UIFont systemFontOfSize:16]}; /* boundingRectWithSize:... 是 NSString 的一个方法 你告诉他最大容纳的尺寸 会帮你计算出这段字符串在这些限制下需要多大的空间 */ CGSize size = [message boundingRectWithSize:CGSizeMake(WIDTH * 0.6, CGFLOAT_MAX) options:NSStringDrawingUsesLineFragmentOrigin attributes:attri context:nil].size; CGFloat height = MAX(60, size.height + 40); [_rowHeightArray addObject:@(height)];}- (void)sendMessage { if (self.textField.text.length == 0) return;
[self addMessage:self.textField.text isOutgoing:self.isNextOutgoing]; self.isNextOutgoing = !self.isNextOutgoing; //实现交替发送 NSIndexPath *indexPath = [NSIndexPath indexPathForRow:self.messageArray.count - 1 inSection:0]; [self.tableView insertRowsAtIndexPaths:@[indexPath] withRowAnimation:UITableViewRowAnimationBottom]; /* 直接到底部 */ [self scrollToBottom]; self.textField.text = @"";}
- (void)scrollToBottom { if (self.messageArray.count > 0) { NSIndexPath *indexPath = [NSIndexPath indexPathForRow:self.messageArray.count - 1 inSection:0]; [self.tableView scrollToRowAtIndexPath:indexPath atScrollPosition:UITableViewScrollPositionBottom animated:YES]; /* 取出最后一条消息然后直接滚动到该条消息处 */ }}
- (NSInteger)tableView:(UITableView *)tableView numberOfRowsInSection:(NSInteger)section { return self.messageArray.count;}
- (UITableViewCell *)tableView:(UITableView *)tableView cellForRowAtIndexPath:(NSIndexPath *)indexPath { MessageTableViewCell *cell = [tableView dequeueReusableCellWithIdentifier:@"MessageCell" forIndexPath:indexPath]; NSDictionary *message = self.messageArray[indexPath.row]; [cell configureWithText:message[@"text"] isOutgoing:[message[@"outgoing"] boolValue]]; return cell;}### 设置
基本资料需要保存之前修改后的男女性别 不能人家改成女的推出去以后又成男的了
还是以前那个方法,只创建一次
```objective-c- (void)showBasicInfo { if (!_basicsVC) { _basicsVC = [[basicsViewController alloc] init]; _basicsVC.view.backgroundColor = [UIColor whiteColor]; } [self.navigationController pushViewController:_basicsVC animated:YES];}Tips:
self.tableView.separatorStyle = UITableViewCellSeparatorStyleNone; // 移除分隔线这个代码可以用来移除cell间的分界线
UIBarButtonItem* btn = [[UIBarButtonItem alloc] initWithImage: [UIImage imageNamed: @"holidayfanhui.png"] style: UIBarButtonItemStylePlain target: self action: @selector(pressReturn)]; self.navigationItem.leftBarButtonItem = btn; btn.tintColor = [UIColor whiteColor];
- (void)pressReturn { [self.navigationController popViewControllerAnimated: YES];}这段代码可以用来自定义返回键类
// 在tabBar上方添加自定义覆盖视图 UIView* overlayView = [[UIView alloc] initWithFrame:CGRectMake(0, 50, WIDTH, tabBarViewController.tabBar.bounds.size.height)]; overlayView.backgroundColor = [UIColor blackColor]; [tabBarViewController.tabBar addSubview:overlayView];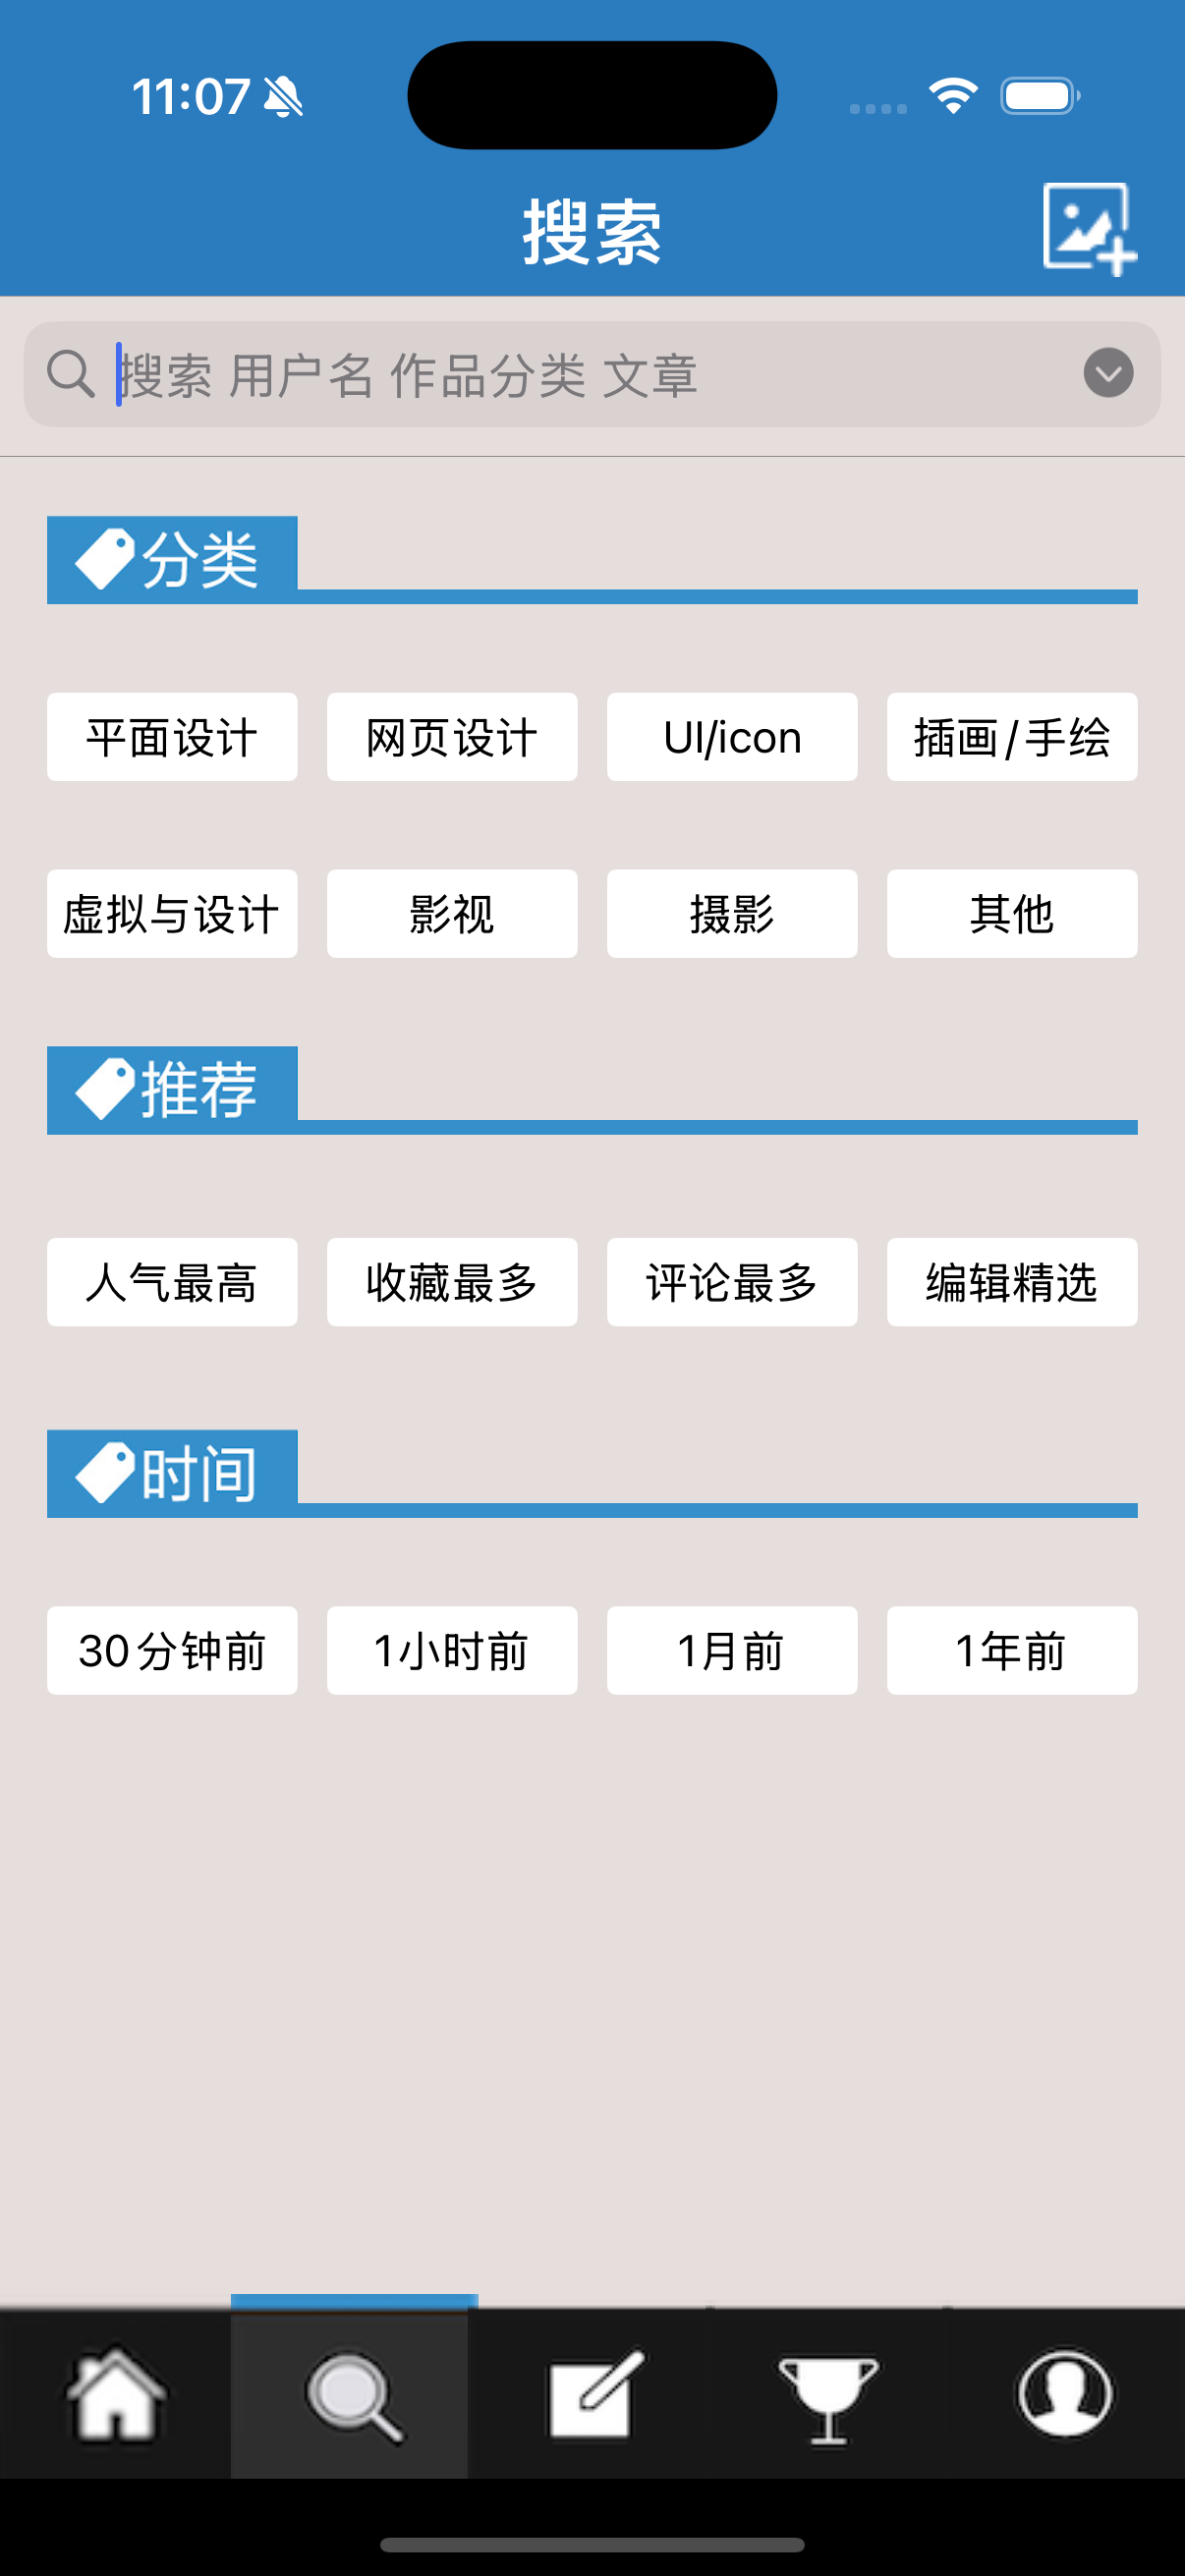
这个代码可以实现遮挡tabBar和屏幕底部之间的区域,更加美观,当然如果为了更加自然可以自己调颜色。
原文发布于 CSDN:iOS —— 3Gshare项目总结与思考